How to Try New Media – Silicone Casting pt 5
- At June 14, 2013
- By sunhawk
- In How To - Guides
 0
0
With my mold ready to go, I poured the catalyst into the cup with silicone and then I started to use one of the house paint sticks, but quickly discovered that it was too big for the cup. As I was mixing, I realized I needed something thin and small enough to let me scrape around the sides of the cup so that all the silicone got mixed evenly. Suddenly I remembered that I had a few palette knives around, one of which was shaped more like a butter knife, so I grabbed that from my painting stuff and it turned out to be perfect for mixing.
7. Try Things One Step at a Time
Now my goal with my silicone casting project was to make coloured bracelets, but after talking to the lady at Sculpture Supply Canada, I decided to do my first test casting without any pigment. This was because pigments have their own effect on casting and I wanted to be sure I had the hang of the basic formula of silicone and catalyst. This way if something went wrong, I wouldn’t have to figure out if it was the catalyst or the pigment or both that was giving me trouble. So once I had mixed the silicone and catalyst for as long as the instructions had told me to do, I carefully poured it into the mold, moving slowly to help it fill all parts of the mold and pouring slow so that the silicone landing in the mold wouldn’t create any big bubbles, which would create empty spaces in the final bracelet.
Once I had poured enough silicone to fill the mold so that it was nearly at the top edge of the mold cavity, I left the mold overnight, after I took the time to clean up after myself and my tools. I left the extra silicone in the cup to solidify as it’s much easier to dispose of as a solid, I would never dump it down the drain as it could possibly get caught somewhere in my pipes and turn into a water-blocking solid.
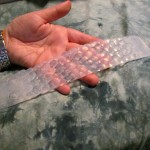
The next evening, having followed more than the minimum amount of time recommended by the silicone instructions for ensuring it would set, I went back to check on my mold. After I had once again performed my “poke to see if it’s solid” test, I carefully bent the mold (which is a nice thing you can do with a silicone mold) so that one end of the bracelet came free, then I peeled it out of the mold and checked it by touch to see if it was properly cured. A properly cured silicone item should not feel sticky or mushy, it should just have normal give and stretch like any silicone you’ve ever handled. My test bracelet had little bubbles in it, which I expected, and I decided I actually liked the way the bubbles gave an added layer of complexity to the dragonscales. I was also pleased to note that the little post areas in my mold that were meant to create holes in each bracelet end for snaps had in fact worked and there were six nice clean holes in the silicone. Hurray!
- My first test casting
- My second colour casting
After I had inspected the mold and resprayed the mold release inside the mold cavity, I set out to try mixing my first coloured bracelet. Now the thing about silicone pigments is that they are what you would call “cure inhibitors” – meaning putting them in the silicone impacts the catalyst’s ability to turn the silicone from liquid to solid. The good thing is that you normally need very little pigment to colour the silicone so ideally you would use enough to colour but not enough to impact the curing. The problem was that I did not have a clear guide for how much to add to the mixture because I was mixing such a small amount of silicone, I would be measuring the pigment out drop by drop, and I had only a rough estimate of how many drops I would need. Still, this is why I was doing a test so I decided on twelve drops of pigment, then I added the silicone and catalyst, and then I mixed all three together and poured the mixture into the mold. The next day I went to pull out the cured bracelet and I noticed right away that I had miscalculated with the pigment, as the new bracelet was very sticky and soft; it felt “wet” but as actually a solid that held its shape which made it kind of gross to hold, much to my amusement.
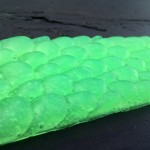
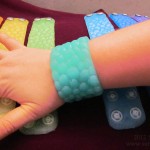
Now I was pretty sure it was the pigment that was causing the issue, but just to be sure I decided to call up the silicone manufacturer and ask them for their opinion. It never hurts to call or email the manufacturer of the product you are using, because they are the experts and usually they are incredibly helpful with sorting out project problems. Even just over the phone with a brief explanation of my project and problem, the representative from Smooth-On was incredibly helpful and confirmed that I had probably used too much pigment. So for my next try, I added half the drops I had used previously, thus six drops of pigment and mixed up another batch of silicone. In the picture above, you can see the results of my second cast, which came out nice and solid. The end result was translucent rather than opaque, but again I liked the result and how it looked, though I did end up also dabbling with the pigment drop amounts and sometimes used ten drops to create a more opaque look. I also learned that some pigments came out more opaque than others, and I experimented with mixing two colours together instead of just using the pigments pure straight out of the jar.
One of the things I hadn’t originally planned for, because I had no idea it existed, was using UB-reactive pigments (they glow under black lights) and I decided to use them because I liked the idea of having a little extra perk to the bracelets and they were the same price as the regular opaque pigments. The interesting thing about UV-reactive pigments is that they come in the “neon” shades that most of us are familiar with (especially those of us who remember how popular “day-glo” colours were in the 1990’s…ooo I am dating myself ha ha) and that means that certain colours are not true to their name – for example, neon “red” actually looks more pink in daylight. So once I had the hang of mixing different pigments, I did one or two bracelets where I tried out mixing the UV pigments with the regular pigments, particularly to try to make neon red look more like a true red.
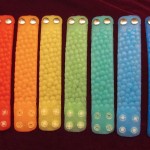
- My first set of coloured bracelets
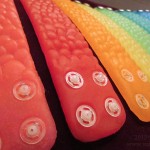
- Close up of the nylon snaps
- Each bracelet had two size options, this is the smaller
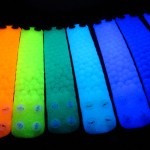
- Under a blacklight! UV reactive pigments rule!
As far as colours went, I was really happy with how the colours turned out, since I decided to do one of each colour for my first batch of ten. You can see in the photo where I had the bracelets under a blacklight, the bracelet on the farthest left doesn’t seem to glow – this was the mixed red bracelet, it did in fact glow, but it require the blacklight to be much closer to the bracelet than the other bracelets. It was an interesting effect, the non-UV pigment didn’t take away the glow entirely, it just rendered it more subtle.
8. Analyse What Went Right
I was really happy with the colours and the clarity of my casting – I was able to successfully make a mold that not only captured every scale on my bracelet model but also created proper holes for the snaps. I got the hang of both mixing the catalyst and silicone to make it properly cure and I had a lot of fun mixing the pigments together to create a bracelet in every colour of the rainbow.
9. Figure Out What Went Wrong
Well I definitely learned that it takes more to degas silicone than a homemade degas tank, I am not even sure how much air I was able to remove with the pump since it was a pretty big box with lots of open space in it. That part wasn’t such a big deal, what was probably the biggest error in my project was that I ended up with bracelets that were actually too fat for me to affix the metal snaps I had bought and intended to attach to them. Basically, those snaps feature a metal post that goes through the material and through the other piece, and you need enough post sticking out of the top of the second piece to allow you to bash it with a hammer to flatten it and thus affix the snap permanently.
Back when I was making my polymer clay model, I didn’t think to test the limit of how thick I should make the bracelet, and the mold reflected this thickness, as did the final bracelets. In the photos above, you can see that I ended up using nylon snaps which I affixed with wire to a metal backing: it worked, but it was not an ideal solution and I was never quite satisfied with it. The other issue was that I was trying to get these bracelets done for FanExpo, which lead me to compromise on my workmanship high bar in an effort to get them ready in a hurry, and since FanExpo I have both located longer snaps that fit on the bracelets AND offered a free upgrade to the few people brave enough to buy one of these bracelets.
Editted to add: Nearly forgot to mention the other big issue, which was that the silicone I ended up using (rather than vinyl) was more stretchy than I anticipated. When I affix snaps to the bracelets, you have to be careful not to pull too hard or fast when getting the bracelet off, because the bracelets can actually stretch to the point that the whole snap will pull free and come through the hole connecting both sides of the snap. This was a crucial thing to figure out, because it’s always best to choose a material that has qualities that you can work with rather than qualities you have to work around.
10. Use What You Learned On The Next Project
Whether it’s taking notes along the way or just writing out your conclusions at the end, unless you have a perfect recall memory, write down all that you learned from the project. Small details will get fuzzy real quick and even one line remarks about materials or methods can be very helpful later! The best kind of instructions for using a medium are the notes you write to yourself, because they will make the most sense to you and will cater to your budget and availability of tools and materials, which is another thing you can add to your notes – where you bought specific items that are not commonly available or you found them for cheaper than the regular price.
Goodluck on your next artistic adventure!
Part One: Pick A Project
Part Two: Organize Your Steps
Part Three: Safety First!
Part Four: Getting the Details Right
Part Five: Try Things Out and Evaluate
~Sunhawk



Get Social