How to Try New Media – Silicone Casting pt 3
- At May 31, 2013
- By sunhawk
- In How To - Guides
 0
0
Now that I knew how much silicone to use, it was time to set up a work station to do the mixing and pouring of the silicone into the mold container. I used my garage because it was an area that would be left undisturbed for as long as it took the silicone to cure (to harden into a solid) and was somewhere that would allow any fumes to safely escape.
5. Being Safe With New Media
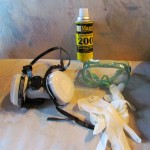
The first thing I did before I use any of the materials for my casting was I located the Material Safety Data Sheets (MSDS) for those casting materials. Lucky for me, the company that made my food-safe silicone included the MSDS sheets in the box along with the silicone and its catalyst. MSDS sheets are full of super important info such as warnings to help avoid making chemicals explode, catch fire or hurt someone with fumes, and they let you know what sort of safety equipment is needed to safely use the material in question. If nothing else, paying attention to whether a chemical requires gloves and a mask is vital to your continued good health. For the silicone I was using, even though it had a rating that didn’t make a mask necessary, I decided to put on my dual cartridge vapour mask just for the sake of staying in the habit of wearing my mask around chemicals – good habits for health and safety go a long way. Also, I was spraying the mold release into the mold container and any aerosol should definitely be something you wear a mask for, and I wore my trusty splash goggles which I put on anytime I am working with a liquid.
- Mask, splash goggles, latex gloves and mold release
- Safety first!
The next thing I read was the instructions for mixing the silicone with its catalyst, specifically the correct ratio of silicone to catalyst, how long I had to pour the liquid and how long it would take to set. I took particular note of where the instructions talked about room temperature: the warmer the room, the faster the rate of curing for the silicone.
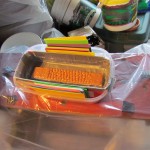
Since I was using my garage in the summer, it was pretty warm in there, which was good for shortening the curing of the mold but also meant I had to be speedy with my pouring, as I had about ten minutes before it would start to become a solid. So before I did any mixing of the silicone, I made sure my work table was set up to be ready for the mold container to sit with the curing silicone, and this included spraying the inside of the mold container with mold release. I had been told it wasn’t strictly needed but good to do just in case, as silicone molds in particular don’t stick to things other than other silicone objects, which was not one of the materials in my model or mold container.
- My garage workspace with plastic sheet in case of drips
- Various mixing tools
- All ready to cure!
Once again, I had a variety of tools that I had bought from the dollar store because I wasn’t sure what kind of tool would serve me best for mixing the silicone; the density of the liquid and its viscosity have an impact on which shapes will work best for mixing. Thus I had both wooden spoons and paint brushes, as well as different sized containers for mixing the two liquids. Now, normally with silicone you would stir the silicone and then use a vacuum machine to “degas” the silicone (remove the bubbles by creating a vacuum to force them out of the liquid silicone) but for the purposes of making a mold of a larger size, I wasn’t too worried about bubbles so I skipped that step. But it’s good to still be aware of how you would normally do things!
The nice thing about silicone is that once it’s mixed with its catalyst, clean up is remarkably easy because the silicone hardens and it is a non-stick substance (this is literally the same stuff your non-stick silicone baking sheets and pans are made of) so you just peel it off surfaces and it comes right off into funny little solid puddles. I ended up mixing my silicone in one of the kid sand buckets and carefully pouring it into the mold container until I could see a reasonably thick layer above the model – this will serve as the mold’s base once the mold has cured.
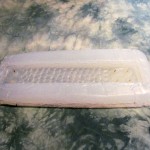
I left the mold container in the garage overnight and checked on it the next day, and I poked it to make sure it was a solid, which it was! Hooray! By removing the foam sheets and twisting and wiggling the container, I was able to remove the mold from the tupperware and gaze upon it in all its glory -ahem- I mean check it over for any flaws that might have come from the bubbles I didn’t bother to degas. It came out great!
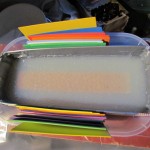
- The mold as it sat in the mold container – upside down
- the mold flipped over to right-side up so that the bracelet area is ready to be poured into
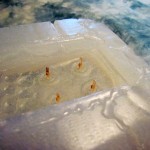
- Close up of one of the sides with snaps
On the close up of the bracelet end that’s meant to have holes for snaps, you can see little brown “posts” that will create holes in the cast bracelets (by creating a void in the silicone – this is why I took notes and did a sketch of my mold! Stuff like negative and positive space can get confusing) and they are brown because they picked up some sawdust left over from my drilling a deeper hole into the wood base for the silicone to fill properly. Now that I had my mold, I could move to the final part of my project: casting bracelets using my new mold, how exciting!
Part One: Pick A Project
Part Two: Organize Your Steps
Part Three: Safety First!
Part Four: Getting the Details Right
Part Five: Try Things Out and Evaluate
~Sunhawk





Get Social